Sheet Goods Cut Optimiser
Plan plywood, MDF and OSB cuts with an online sheet goods cut optimiser that improves nesting, reduces waste, and helps you get more from every board.
What a Sheet Goods Cut Optimiser Does
A sheet goods cut optimiser helps you arrange rectangular parts on standard boards so you can see how many sheets are needed and how they should be cut. Instead of manually sketching layouts for plywood, MDF or OSB, you enter your parts and the tool finds an efficient nesting arrangement in seconds.
This is especially useful for cabinet parts, furniture panels, workshop projects, storage units, van fit-outs, and any job that uses multiple rectangular pieces cut from sheet material. The optimiser compares different board sizes, accounts for blade kerf, and generates a purchase summary alongside a cut plan.
- Enter parts with width, height, quantity and rotation preference.
- Choose standard sheet sizes or add your supplier's custom dimensions.
- Set blade kerf so the plan reflects real material loss per cut.
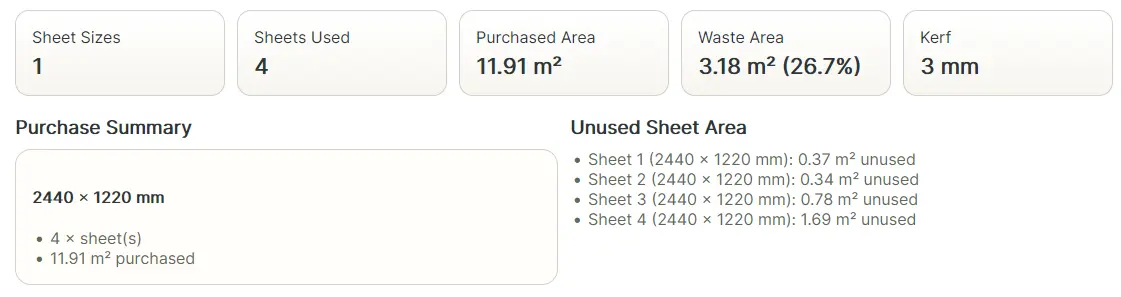
- Get a purchase summary showing how many boards to buy.
- Export the cut plan as CSV or PDF for the workshop.
Why It Helps Reduce Board Waste
Without a cut optimiser, most people arrange parts in the order they appear on a cut list, or sketch layouts by hand. This approach tends to leave large offcuts between parts, miss rotation opportunities, and underestimate how many boards are needed.
- It compares your required parts against standard sheet sizes and finds efficient layouts.
- It tests rotation automatically, fitting more pieces onto each board where possible.
- It reduces guesswork when planning plywood and MDF cutting layouts.
- It makes it easier to confirm how many sheets to order before going to the supplier.
Plywood, MDF and other sheet materials are expensive enough that poor board planning can cost real money. Saving even part of one sheet on a job (avoiding one unnecessary board purchase) can make the optimiser pay for itself immediately.
Worked Example: Cabinet Carcass Parts
Imagine a simple wall cabinet with the following parts, all cut from 18mm plywood:
- 2 × sides: 720 × 300mm
- 1 × top: 564 × 300mm
- 1 × bottom: 564 × 300mm
- 2 × shelves: 564 × 270mm
- 1 × back panel: 600 × 720mm (from 6mm ply)
Without rotation, the carcass parts may not nest efficiently on a standard 2440 × 1220 sheet and could spill onto a second board. With rotation allowed on the shelves and bottom, all five carcass parts can fit on a single sheet with usable offcut remaining. The optimiser tests these arrangements automatically and shows the most efficient layout, along with how many sheets to buy.
It also deducts blade kerf from each cut (typically 3mm), so the layout accounts for the material actually removed rather than treating cuts as lossless.
Choosing the Right Board Size
Standard sheet sizes vary by supplier. The most common in the UK are 2440 × 1220mm (8 × 4ft) and 3050 × 1220mm (10 × 4ft), with half-sheet options at 2440 × 606mm sometimes available. Using the wrong board size in your plan can make the layout look more efficient than it is in practice.
The sheet goods optimiser includes standard board sizes and lets you add custom dimensions. If your supplier stocks a non-standard size, for example 2500 × 1250mm or 1220 × 1220mm, you can add it directly so the optimiser works with what you can actually buy.
You can also compare results across multiple board sizes in a single run to see whether a larger or smaller sheet reduces your total purchase.
Where It Is Most Useful
- Cabinet making and carcass panels: sides, tops, bottoms, backs, shelves and door blanks.
- Built-in furniture: wardrobes, bookcases, pantry units and fitted storage.
- Workshop storage: drawers, tool cabinets, jigs and workbench tops.
- Furniture builds: tables, beds, desks and custom pieces cut from sheet goods.
- Van and trailer fit-outs: multiple panel sizes from a small number of full sheets.
- General joinery: panel-based fabrication where parts repeat across boards.
How to Use the Sheet Goods Optimiser
- Select Sheet Goods mode in the optimiser to switch from the linear timber workflow.
- Choose your standard board sizes: tick the sizes your supplier stocks, or add a custom size.
- Set blade kerf: a circular saw typically removes 2–3mm per cut.
- Enter your parts: add each part with its width, height, quantity, and whether rotation is allowed.
- Run the optimiser: the tool calculates the most efficient nesting arrangement and shows a purchase summary.
- Review and export: check the cut plan and board count, then export as CSV or PDF.
What the Results Tell You
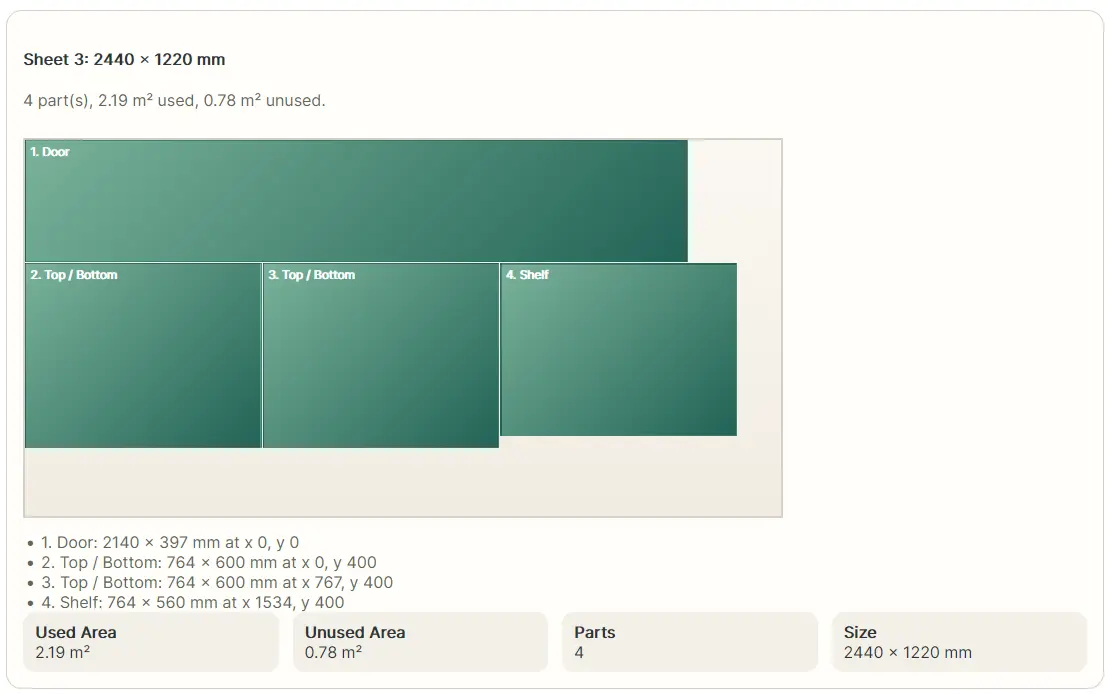
The optimiser produces two outputs: a purchase summary and a cut plan. The purchase summary shows how many boards you need to buy for each sheet size. The cut plan shows how parts are arranged on each board, including their positions and any rotation applied.
You can also see the waste percentage for each board: how much of the sheet is unusable offcut after all parts are cut. A lower waste percentage means a more efficient layout. If the waste is high, it is worth trying a different board size or enabling rotation on parts where grain direction is not critical.
Rotation and Practical Layout Planning
In many panel-cutting jobs, allowing parts to rotate can significantly improve sheet usage. A part that is 600 × 300mm takes up the same board area whether it is portrait or landscape, but its orientation relative to nearby parts determines how efficiently the sheet is used.
If grain direction, finish orientation or face pattern matters (as it would for plywood cabinet doors or visible tabletops), you can restrict rotation on those parts. For structural panels, backing boards, or MDF where appearance is not a concern, allowing rotation typically reduces waste.
This makes a sheet cutting optimiser useful not only for raw material planning, but for real production decisions in the workshop.
Frequently Asked Questions
- What is a sheet goods cut optimiser? It places rectangular parts on boards such as plywood, MDF and OSB to reduce waste, show how many boards to buy, and produce a cut plan.
- Can it help with plywood cutting layouts? Yes. It is well suited to plywood sheet planning and works for MDF, OSB, chipboard and other panel materials.
- Why does rotation matter? Rotating parts can allow more pieces to fit on each board, reducing the number of sheets needed.
- Does it account for blade kerf? Yes. You enter the kerf in millimetres and the optimiser deducts it from each cut in the layout.
- What board sizes does it support? Standard sizes are included, and you can add custom dimensions to match what your supplier actually sells.