How to Reduce Waste When Cutting Plywood
Reduce plywood waste with better sheet planning, realistic layouts, kerf awareness and a practical sheet goods cut optimiser before you start cutting.
Why Plywood Waste Adds Up Quickly
Plywood is one of those materials where small planning mistakes become expensive very fast. A single inefficient layout might only push two or three parts onto a second sheet, but that second sheet costs as much as the first one. You end up buying an extra board for parts that could have fitted with better planning.
That is why reducing plywood waste is not just about being tidy. It is directly connected to material cost, project margin, and workshop efficiency. The good news is that most plywood waste is avoidable with planning: specifically, by working out the layout before you make the first cut rather than after.
How Many Sheets of Plywood Do I Need?
This depends on the dimensions of your parts, the board size you are using, and how efficiently the parts can be nested together. You cannot reliably calculate it by dividing total area, because parts cannot be split across boards and gaps between parts are unavoidable.
The accurate way to answer this question is with a sheet goods cut optimiser. Enter your parts, each with its width, height and quantity, then choose a board size, set the blade kerf, and the optimiser produces a purchase summary showing exactly how many sheets to buy. It also shows a cut plan and the waste percentage for each board.
As a rough guide: a standard 2440 × 1220mm plywood sheet has a usable area of about 2.97 square metres after kerf. Summing your parts' areas and dividing by 2.97 gives a minimum sheet count, but the real number is typically 10–25% higher once you account for efficient nesting. An optimiser closes that gap.
1. Plan the Sheet Layout Before Cutting
The biggest waste often happens when parts are cut in the order they were written down, rather than in the most efficient layout. Cutting the first part that appears on the list can leave odd-shaped offcuts that are too small for the remaining parts.
Planning first (even a rough hand sketch) helps you fit more pieces onto each sheet and makes it easier to see whether a different board size or cut order would work better. A cut optimiser goes further by testing many arrangements automatically and finding the one that wastes the least.
2. Use the Actual Board Sizes You Can Buy
Waste reduction starts with realistic inputs. If your supplier stocks 2440 × 1220mm and 3050 × 1220mm boards, plan your layout using those sizes, not idealised dimensions you cannot actually buy. A layout that works perfectly on a 2500 × 1250mm board may not work at all on the 2440 × 1220 that is actually available.
It is also worth comparing results across multiple board sizes. Sometimes a 10 × 4 sheet (3050 × 1220) allows more efficient nesting than two 8 × 4 sheets, even though the total area is similar. A cut optimiser lets you test this in seconds.
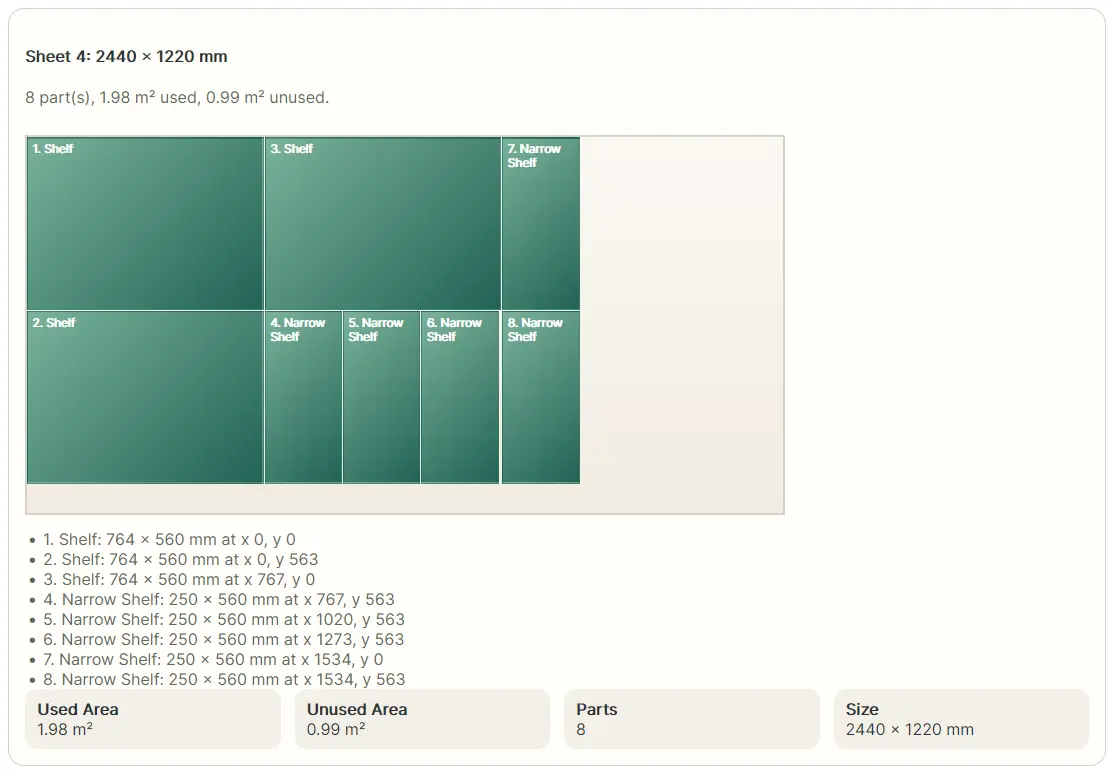
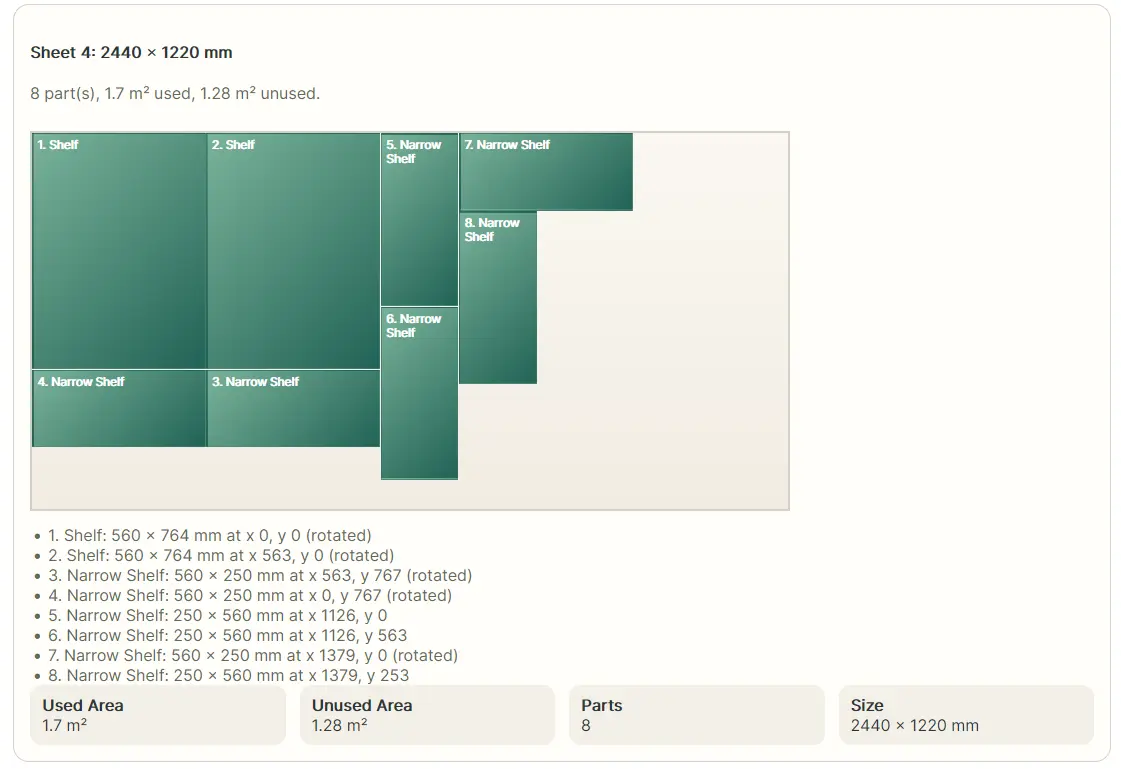
3. Allow Rotation Where It Makes Sense
Rotation is often the single biggest factor in whether parts fit efficiently on a sheet. A part that is 600 × 300mm takes the same board area whether it is portrait or landscape, but its orientation relative to other parts determines how well the space is used.
For structural panels, backing boards, and MDF where appearance is not a concern, allowing rotation almost always reduces waste. For visible plywood faces where grain direction needs to match (cabinet doors, tabletops, drawer fronts), you may need to restrict rotation on some parts. A cut optimiser lets you control this per part, so you only lock orientation where it actually matters.
4. Include Blade Kerf in the Plan
Every cut removes material. A circular saw or track saw typically removes 2–3mm per cut. On a sheet with four rip cuts and four crosscuts, that is already 16–24mm of material consumed by the blade. If parts are packed tightly, ignoring kerf can mean a part that was supposed to fit on the board does not, and you need an extra sheet.
Kerf-aware planning gives you a more realistic view of what each sheet can actually produce. Enter your blade kerf in the optimiser before running the plan, and every cut will be accounted for correctly.
5. Group Similar Parts and Check Quantities Carefully
Incorrect quantities are one of the most common sources of unexpected extra sheets. If you enter 4 shelves when you need 6, the optimiser will produce a plan that looks efficient but leaves you two shelves short. Double-checking repeated dimensions and quantities before running the plan catches this before it becomes a material problem.
Grouping similar parts in your cut list (all the same-size pieces together) also makes it easier to spot entry errors and verify the final count before ordering material.
Common Plywood Cutting Mistakes
- Planning on nominal dimensions. Plywood is often thinner and slightly smaller than its stated size. An 18mm board may measure 17.5mm. A 2440 × 1220mm sheet may be 2430 × 1210mm after trimming. Use actual measured dimensions if precision matters.
- Ignoring blade kerf. As above: each cut removes material. Including kerf prevents layouts that look fine but fail on the bench.
- Not allowing rotation. Leaving all parts in a fixed orientation when rotation would be fine wastes nesting opportunity.
- Using area-based estimates. Dividing total part area by sheet area consistently underestimates the number of sheets needed because parts cannot overlap or be split.
- Cutting from the wrong end of the sheet. Even with a good plan, starting cuts from the wrong edge can commit you to a layout that wastes the remaining sheet. Following the cut plan sequence matters.
Why a Sheet Goods Optimiser Can Pay for Itself
Plywood, MDF and similar boards are expensive enough that saving even part of one sheet can justify using a better planning tool. If an optimiser helps you avoid one unnecessary sheet on a job (which happens frequently when parts are close to filling a sheet and manual layouts leave them overlapping the edge), it can often pay for itself immediately.
That makes a sheet goods cut optimiser valuable not just for convenience, but for direct material savings on every job that uses sheet goods.
Frequently Asked Questions
- How do you reduce waste when cutting plywood? Plan the layout first, use real board sizes, allow rotation where possible, include kerf, check quantities, and use a sheet optimiser before cutting.
- How many sheets of plywood do I need? Enter your parts into a sheet goods optimiser with the correct board size and kerf: it produces an exact purchase summary. Area division alone underestimates by 10–25%.
- Why is plywood waste expensive? Because poor planning can lead to offcuts you cannot use and extra sheet purchases you did not need.
- Does rotation reduce waste? Often significantly. Allowing rotation where grain direction does not matter typically lets more parts fit on each board.
- Does kerf matter with plywood? Yes. Kerf still removes material and should be included in a realistic plan for sheet goods as well as timber.